The
Cryolite Monitor
10 FEB 2005 - Last Update
About $225/pair plus cabinets
|
CRYOLITE
LINKS
|
Introduction
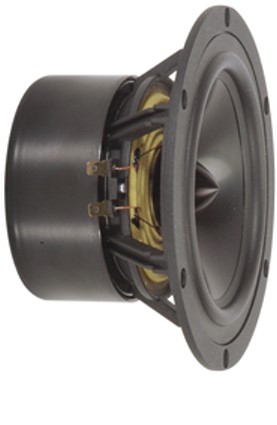
When Parts Express introduced the Dayton RS aluminum cone series, I knew I had to build designs with them. I chose the RS-180 as I wanted a full range monitor capable of running without a sub, but still in a reasonable box size.For a tweeter, I first experimented with the Vifa D25.
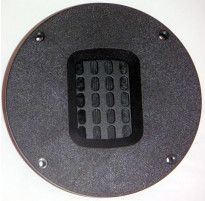
After playing with a prototype box, I decided that the Cryolite needed to be reference standard for my designs. I changed to the recessed version of the NEO 3PDR. I used the Neo in a previous design and really fell in love with the smooth, silky sound.
Dayton
RS 180
Aluminum Cone Woofer
NEO 3PDR with
Recessed Faceplate
I played with a variety of sizes for the box before settling on 19 liters. This seems to be a good compromise of size and F3 bass. (It's actually very easy to set up cuts, baffles and sides are both 9.5 inches.) Based on my models, you could use the 0.75 cu ft Two Way PE prefab cabinet, and get very similar results. Just layout the drivers as I have shown. The larger cabinet will allow a bit more driver excursion. The port is behind the NEO (2-3/8" cutout)
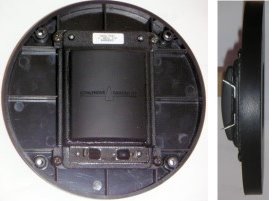
The recessed plate requires a 7/16 deep rabbet, necessitating a thicker 1" baffle. If you choose to use it, 4 1/8" hole will get most of the Neo into the box. Some hand filing will be needed to get the set screws on the lead side into the hole. The plate comes with mounting screws for the Neo and for the baffle. The plastic is pretty fragile, I managed to split one of the mounting holes. Some hot melt fixed things up. With a 1" baffle, I covered the back of the Neo cutout with a sheet of 1/8" masonite to seal the opening and stiffen the baffle. I noticed some minor leaks around the tweeter during testing. I simply drilled two small holes in the masonite to pass the wires from the Neo into the box. (BTW, I placed a Neo ON a CRT, no effect! Very well shielded!)
The RS also took a bit of tweaking to mount. Though the driver OD is officially 7-1/8" the rabbet was too tight and needed sanding to clear the driver. So my measurements are a bit larger to accomodate paint and clearcoat. ( I cut the thru holes, assemble the box, veneer, rout out the holes with a flush trim bit, rabbet the recesses, hand paint the rabbets, then shoot clear coat.)
I came up with an easy way to fine tune the rabbet bit. I wrapped layers of electrical tape around the bearing and trimmed it down. By unwrapping layers I could get the precise depth of rabbet cut I needed.
The inside of the box is lined on the sides, top, and back with grey accoustic foam. I also buried PE neo magnets under the veneer for later use with a grill.
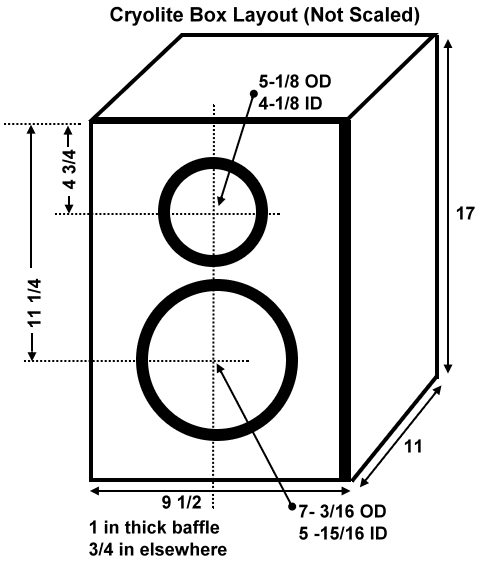
| Volume: | 1180 Cu In, 19 liters |
| Tuning: | 2" D by 6" L (F3-41 hz) |
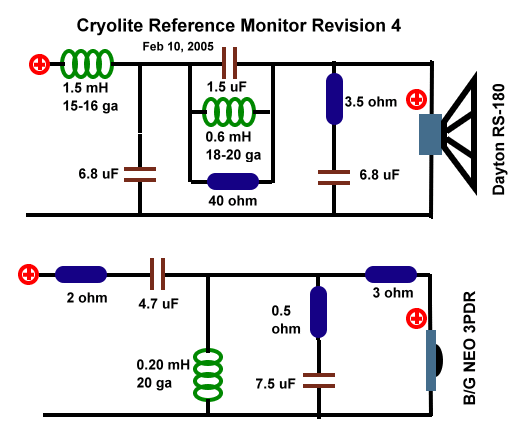
Crossover Design
I measured the drivers outdoors on cool windy day. I had to use a short (1 meter) square stand to keep the box from blowing over. (Too big for my tall tube stand) As I was racing the rain, I accepted a bit more ground reflection. I setup at about 1.3 meters so the Db scale is lowered. (See my measurement page for methods) I used a 30 mfd cap to protect the Neo (I should have gone to 40) The curves are a bit ragged, but adequate for design.
The crossover is a bit complicated. Pushing the RS out to the 2400hz crossover point required both a notch filter and a pseudo zoebel shaping circuit to contour the midrange a bit. This circuit will drop the breakup region by almost 40 dB.
On the tweeter side, the second order is supplemented by by an RC parallel circuit that does some shaping in the 6-20 K region. I settled on the 7.5uF cap and 0.5 ohm resistor. Larger values will drop the top octave. The split padding resistors will help to maintain phase alignment at the crossover frequency. I chose to use Mills resistors for my final design, but the parts list assumes stock PE components, Using the 2 ohm ahead of the circuit raised the overall impedance a bit. You may experiment with a 2.4 or 3.3 resistor in place of the 3 ohm if you need to voice for your own tastes.
A couple of folks wanted to know if the design would work with the surface mounting plate for the Neo. I spent some time in LspCad and came up with a surface mount crossover. I assumed the NEO would be 7/16" farther forward on the baffle. I assumed the RS-180 would be recessed.
Listening Impressions
Overall, this design is a very smooth, and neutral sounding I don't find the Cryolite lacking anywhere in the band. Very crisp vocals, piano, nice air on the high end. Virtually no sibilance anywhere. It may be voiced a wee bit forward (compared to some of my other designs) as the Neo is very well behaved and is capable of running a little hotter than many dome tweeters.
Bass is very impressive, reaching well down into the low 40's. Imaging holds up very nicely off axis. After I had some hours in on the Cryolites , I invited a couple of friends over. We benchmarked against my ACI Jaguars. I finally settled on this variation. After extensive tests, we concluded there were subtle differences but the Cryolites would be a worthy replacement.
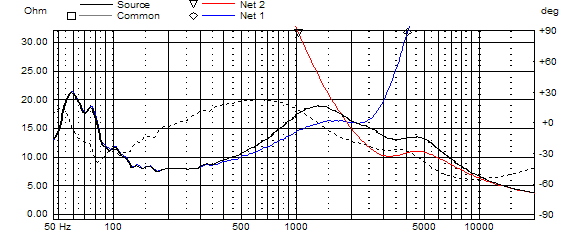
Cryolite Impedance Profile
Finishing
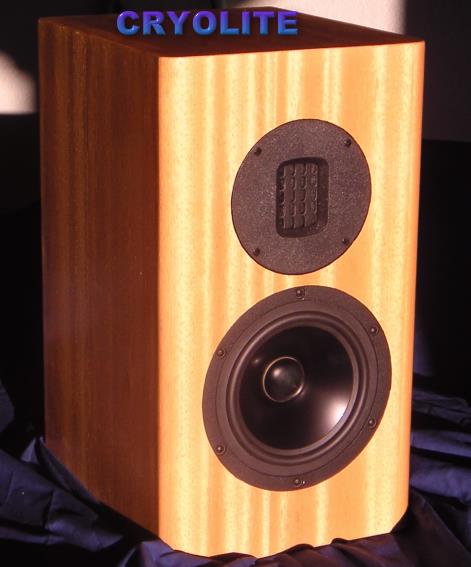
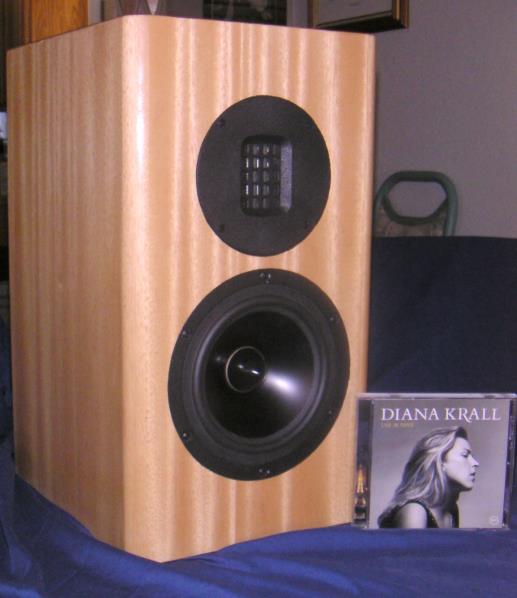
I used what I call a 3/4 wrap of Tigerwood veneer from Formwood. The front baffle has a 3/4 radius along both vertical edges. After sanding the cabinet smooth with 180, I covered both the veneer and box with two coats of solvent based contact cement.
A light sanding of the veneered box was followed by 1lb cut of dewaxed shellac tinted lightly with a few drops of Transtint Golden Brown dye to pop the grain. A light hand sanding with 400 grit and a bit of compressed air prepped the boxes for finish. I sprayed the boxes with 3 coats of Fuhr 355 waterbourne acrylic varnish. The finish you see is straight off the gun.
Front
3/4 View
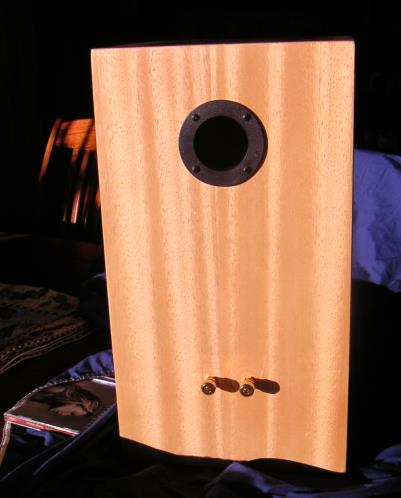
BACK VIEW
SIDE
VIEW
(This is probably the best color/texture rendering of the Tigerwood)
