 |
Lou's Home Page Last Updated: 8 June 2008 |
|
|
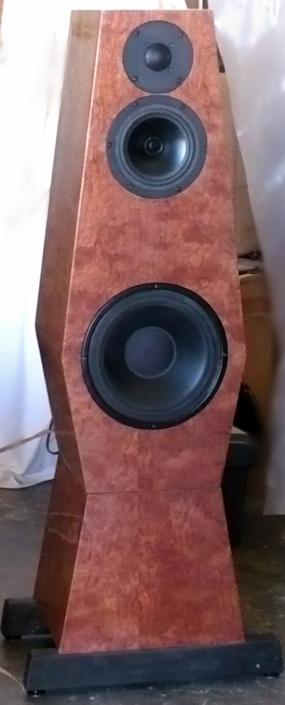
Woofer: Peerless 831858 DVC Mid:
Dayton RS-150-4 Tweeter: Seas 27TDFC/G |
|
|
||
Intial Design Considerations
The Calliope began life as a statement design for a former boss and very good friend who recently took over as chancellor of a major Eastern university. After years of living out of a suitcase, she will finally have some home time. I promised her my best design. Though not really an audiophile, she does have an exquisite sense of style. (Yeah guys, I know. That isn't me!) She chose Kevazinga veneer as a nice match for much of the oriental mahogony furniture she favors.
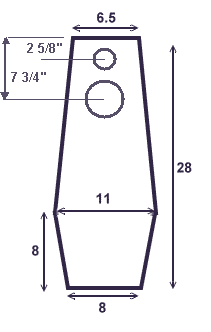
The box shape is a concept I've played with for a couple of years. I always said I would build something like this. I believe Nestorvic sold a design with this inverted coffin shape. Once I decided on the shape, I cut enough baffles to do 4 speakers.
[For more on the cabinet construction CLICK HERE]
The first design I tried used a Seas CA21REX/DD 8"; MB Quart (round) Mid Dome; and Seas 27TFFNC/G (H1396) neo tweeter. Total disaster. I spent hours trying to make that combo sound good. Gave up on the MB Quart, tried an RS-52 dome. Still too harsh. I gave up and decided to go with stuff I knew would work.
I picked up four of the Peerless DVC when Madisound cleared them out, along with two of the Seas 27TDFC/G. I'd heard the Peerless as a small sub, and thought it had some really serious thump. I wasn't sure how high I could really push the Peerless so I wanted a flexible mid. Since I liked the U3 and Ruby designs, I chose an RS-150. The 4 ohm version assured me I would have enough sensitivity to match up with everything.
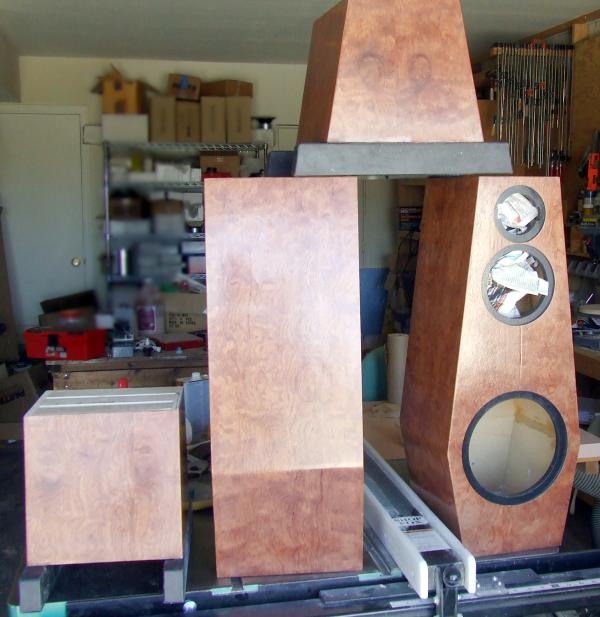
Cabinets and stands after rubout
 |
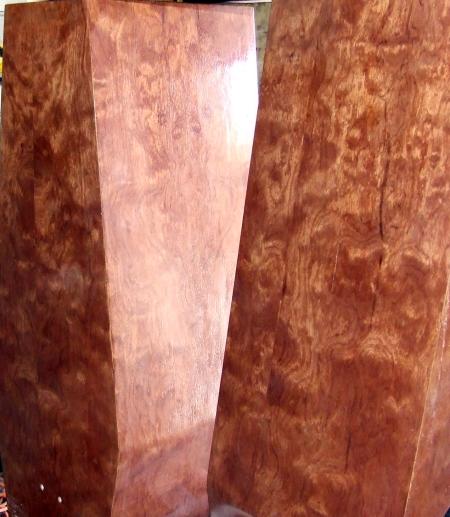
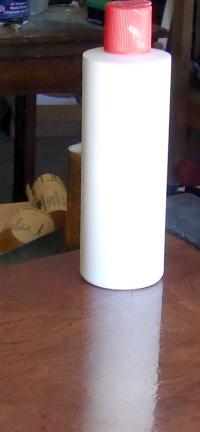
After months of procrastinating and health issues, I finally got down to veneering and finishing. I built the stands out of 1/2" baltic birch BB. They are braced a bit inside to keep them rigid. The plinths are built up from two layers of 1/2" BB. I included a threaded insert at each corner so I could use polyurethane feet. (They are going on polished wood floors). I also epoxied 6 neo magnets in each baffle to hold the grills. I cut my veneer into 1' X 8' strips. The strips were then cross cut and match lines were drawn. Each side is done as a visually continuous wrap from the stand, over the top and back to the stand. Front and back are also matched. All edge trimming was done with a utility knife and hand sanding block. I decided to try the iron on method using HeatLock adhesive from Joe Woodworker/Veneer Supplies. I purchased a roller and some veneer softener to go along with the HeatLock. The roller is a definite plus -- just make sure you clean it while the glue is still wet. Overall, I was very pleased with the HeatLock. When I learned to use TWO coats on both the Kevazinga paper backed veneer and the MDF substrate, everything went fine. On one panel, I did a single coat. As soon as I hit it with finish, the veneer bubbled up. I managed to save it by slicing the veneer, and injecting glue underneath. Let it sit, reheat. I'm not sure this method has any time savings over solvent based contact cement. Both take about the same time to dry. The hard glue line with HeatLock definitely makes it easier to edge trim and rout the speaker holes. I'll probably use this product in the future. Money wise it's probably a wash. Contact cement is similarly priced, but the fumes give a clear edge to the HeatLock.I did final sanding with 220 grit and my finishing sander. Next I used a 1 Lb cut of shellac, lightly tinted with a few drops red dye, to seal the veneer and pop the grain a bit. Another quick hand sand with 220, and the boxes were ready for spray. I managed to to spray 5 coats of Fuhr 375 waterbased acrylic lacquer in about 3 hours. With bubbles, I had to stop, let everything dry thoroughly, and fix the veneer. The Kevazinga has a lot of wide open pores. I prefer a minimalist approach to finishing these kinds of woods. (Oak, Ash, Zebrano, ... I think open pore reminds people that it's real wood, and invites them to touch it.) Since I had to sand off most of the finish for veneer repair, I went ahead and sanded all surfaces as flat as I could. I then shot another three coats on the boxes. After 3-5 days I normally I use 1200 then 2000 grit followed by 0000 steel wool to rub out the final finish to satin. With this dark veener, that just didn't work. The Fuhr 375 sands out to white, so the rubout just made things hazy. I found some MENZERNA polishing compound in my stash. After a couple of hours, I was able to get the finish shown. Using this compound on an open pore finish is not the right way to go. The compound gets caught in the pores. But by using my spare Surbuf pad with some soapy water, I was able to remove most of it. Lighter applications, on a dry pad, seemed to do best. The result is a polished "semi-filled" finish. Grain pores are still visible, but a nice high gloss. |
For the plinth/feet I sprayed with black PlastiDip "tool dip". This does a nice rubbery coating that will take dings from vacuum cleaners without chipping too bad. Pricey, not great coverage, but far less toxic than truck bed liner and less brittle than Duratex.
Despite all my testing, the magnetic grill guides just don't work well enough. As long as there is no fabric, and just the magnets touch, everything works fine. Once I put the cloth on, they slid right off. This might have worked, if I could keep the cloth from getting between the grill frame & the speakerfront. I didn't allow a big enough gap. Loud bass, or even a bit of floor bounce from a passing foot is enough to knock them off. Back to peglocks [heavy sigh here!]
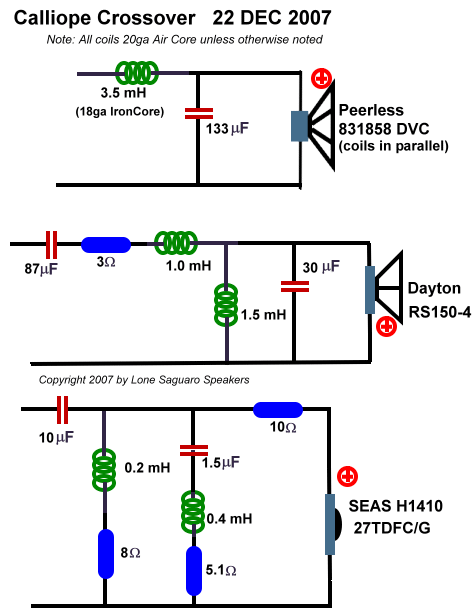 |
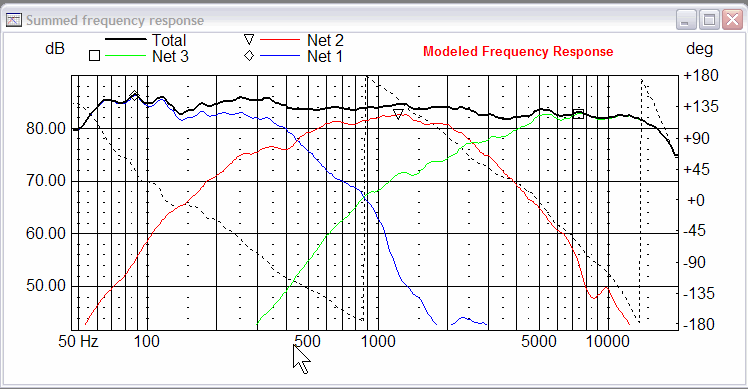
The woofer uses a simple second order cap & coil. As it turned out, my best single coil (8 ohm) design had only 1 ohm higher impedance than than this parallel design. The result is a 3rd order acoustic slope crossing to the mid at 450 Hz. I wound up pulling components out of the mid circuit. No trap filters, no zoebel. I orginally used an 80 electrolytic + 6.8 poly for the initial cap -- but relented and replaced the electrolytic with Daytons. I tried a parallel trap in the circuit (for breakup control) but found it unnecessary. Again 3rd order accoustic slopes on both sides. Breakup modes for the 150 are down about 30db -- without use of a notch. For the midrange, I wound up with 3 ohm padding. I actually use two 6 ohm in parallel (to make the indicated 3 ohms in the mid) for increased power handling. The tweeter sounded best crossed at about 2500 Hz. The series trap controls the small peak at 5500 Hz. The 8 ohm does some shaping and flattening. I could live with 8-9 ohm padding at lower levels, but 10 seemed better at higher volumes. Since these will go into a live room, I chose 10 for the final design. |
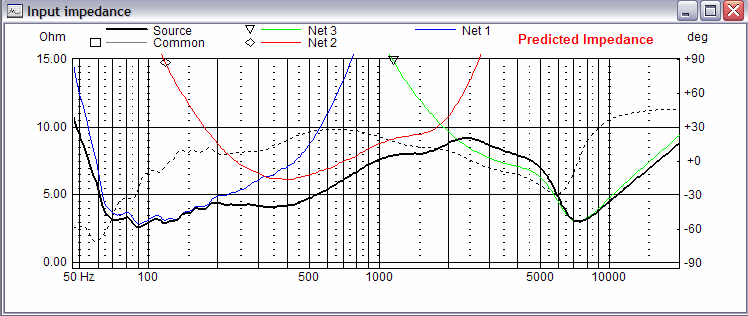
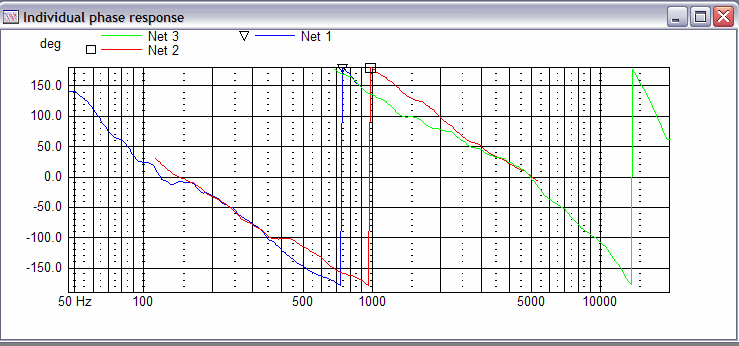
I would probably call this a 4 ohm design, mainly because of the dip at 80 Hz. The rest of the profile is pretty benign, vascillating between 4 and 9 ohms. The woofer/mid are in phase from 150 to 450. That hand off is quite seamless in listening, and was defintitely a problem area in discarded prior designs. The phase alignment for tweet/mid is also seems spot on.
Initial Listening Impressions
As of Dec 22, 2007, only one is built and listenable. I set up an old Pioneer DVD changer with a Dayton APA150 Amplifier in my shop for auditioning and tweaking. The APA150 can sum stereo input into mono output. I've listened to about 15 hours, and I'm thoroughly happy with the design. From the perspective of full range reproduction, balanced output, and "magic smoke", I think this will be my best to date.
The Peerless has real thump. At very high levels, with synth bass, it's reaching it's limits. Not the ultimate headbanger special, but there's nothing like the tight controlled sound of sealed box bass. Most folks used this driver as a small sub. With 7.5 mm of Xmax, it's capable of doing an F3 of 42 hz sealed. Old school, but one tough 8" driver.
The RS150 doesn't cover as much of the midrange as some other designs I've done, but it covers most vocals extremely well. Clear, lots of air and volume. No sign of any stress. Taking the tweeter out confirmed the absence of significant breakup. The fairly small bandwidth will make it easier to do final stereo voicing. I think this is the best value in the RS line.
I understand why people like this Seas. Nice air, extremely fine percussion reproduction. In this design, running it too hot REALLY set my teeth on edge. 7 ohms should be flat, I finally stopped padding at 10. With the sloped sides, mounting the tweeter has fewer options. (I didn't want to offset the tweeter for aesthetic reasons.) As you move the tweeter down the baffle, the distance to the sides remains fairly constant, so I chose to move it up to the top and deal with edge diffraction in the crossover. I think the 5500 Hz peak is part of the edge effects. Though I prefer the H1212, I liked this implementation almost as well. The grid variant will be a safeguard during shipping (Sorry Zaph, I don't think the hexagrid is all that ugly)
