The Opals -
Quick and Easy
Lou Coraggio © 2001 All Rights Reserved Back
to Home Page
 I
recently got a consignment to replace some ancient bookshelf speakers for some
friends of mine. The speakers were to be a surprise birthday present. I had
a cap of about $500 to produce a pair of "free standers" to fit in a large room
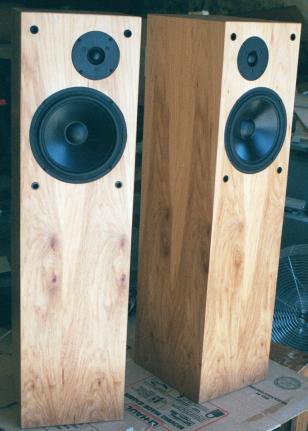
filled with the eclectic furnishings of two world travelers. The Opals from
Subwoofers.Com seemed like the best
choice. Since this couple lived on a pecan orchard, I ordered a sheet of NBL
from tapeease.com. As I was planning the
layouts, I noticed the slip match of the veneer was about 5.5". One side had
a beautiful set of heart wood "cathedrals". I decided to cut down the sides
to better fit the veneer. Each long panel was cut 39" x 10" resulting in net
volume of about 1.7 cu ft. The final dimensions of the MDF
cabinets is 39 x 11.5 x 10.
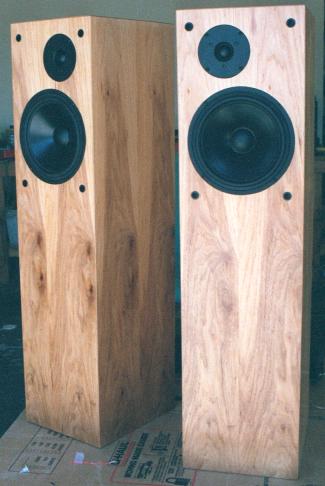
I
recently got a consignment to replace some ancient bookshelf speakers for some
friends of mine. The speakers were to be a surprise birthday present. I had
a cap of about $500 to produce a pair of "free standers" to fit in a large room
filled with the eclectic furnishings of two world travelers. The Opals from
Subwoofers.Com seemed like the best
choice. Since this couple lived on a pecan orchard, I ordered a sheet of NBL
from tapeease.com. As I was planning the
layouts, I noticed the slip match of the veneer was about 5.5". One side had
a beautiful set of heart wood "cathedrals". I decided to cut down the sides
to better fit the veneer. Each long panel was cut 39" x 10" resulting in net
volume of about 1.7 cu ft. The final dimensions of the MDF
cabinets is 39 x 11.5 x 10.
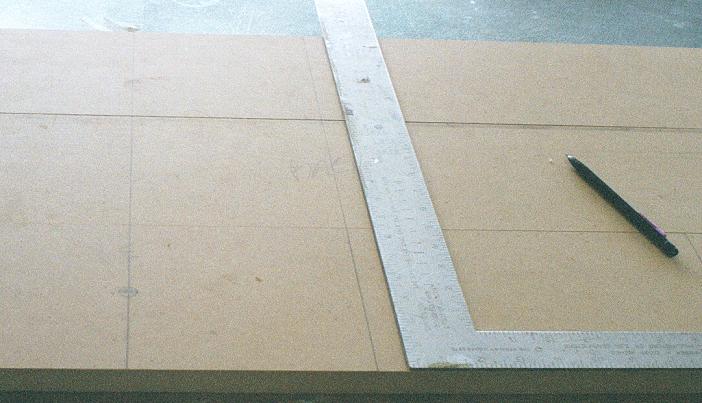
A side benefit
of reducing the side panels was a very easy cut layout. (An option for those
of you who get your panels cut at the lumber yard. Eight 39 x 10 panels and
ten 8.5 x 10 panels can be made from a single sheet of 3/4 MDF. Since I used
biscuits to join the cabinet, I used a "storyboard"
layout approach. I first mark up one side with locations for each brace.
Then I line up the other three sides, and scribe the lines with my framing square.
If you are off a bit, your box should still come out square.
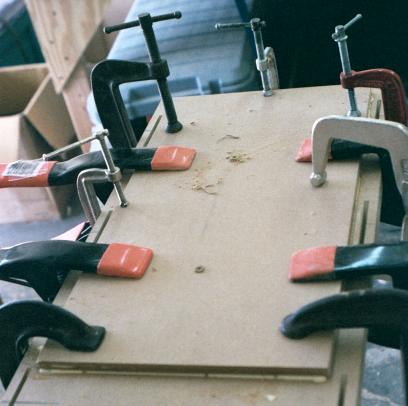
For assembly, I
laid out the back flat on my work bench. I placed wax paper over the back. Next
I setup each of the braces and the two sides. When I was sure I was square,
I clamped and glued the sides (with all the braces) using wood glue. The wax
paper keeps the glue off the back. I added an additional
3/8 panel behind the drivers so I had to glue this to the main baffle. (I
did cut down two braces to accommodate the extra thickness. I next glued the
back to the sides using wood glue on the biscuits and outside edge, and a thin
bead of Liquid Nails along the inside (to help seal the cabinet). Any overhang
was easily handled with my flush-trim router bit.
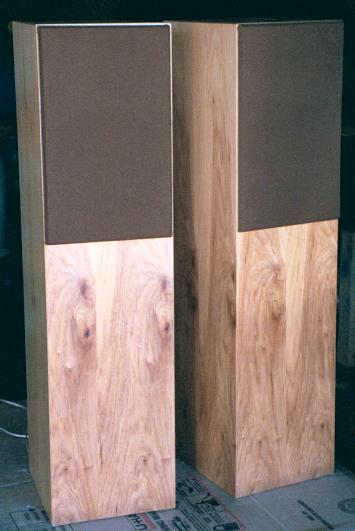
For the grills,
I used 3/8 stock. I first cut a template with square edges inside and out. Then
I cut two blanks on my tablesaw with a 60 degree chamfer. I then screwed the
template to each blank. I drilled a 3/4 hole to allow me to use my flush-trim
bit on the "real" grill. With the opening cut, I then ran my chamfer bit around
the inside edge of the "real" grill. Cloth was applied with hot melt glue. (If
you use 3/8, you will have to sand down the male HedLok fastener) I did cut
down the grill size to 16 inches.
I routed the cutout
holes for each of the drivers in the front baffle using a Jasper jig. After
veneering, I planned to use my rabbeting bit to cut the recess for the drivers.
After test fitting, I then clamped and glued the baffle.
For veneering,
I tried 3M High Strength 90 spray adhesive. I got nowhere near the coverage
expected, and I had to fix a couple edges where I missed spraying. Considering
the expense ($13/can) and the masking time, I'm not sure there is much of a
saving over solvent based contact cement. The veneering went quickly. The only
hangup was with the woofers. They didn't fit the holes depicted in the kit directions.
By using a wood rasp, I was able to widen the thru hole a bit, and rerout with
my rabetting bit.
After experimenting
on several projects, I now have my signature finish down pat. I use at least
three layers of Deft Clear Wood Finish (Gloss) applied with a good china bristle
brush. Lay the speaker horizontal and lay down thick wet coats. After 10-30
minutes, you can rotate the piece 90 degrees and do another side. Let these
dry 1-2 hours. Turn another 90 and repeat. Using this method I finished the
Opals in two days. Now here's the trick. DON"T use anything but HIGH GLOSS.
If you want a satin finish, get a pad of synthetic steel wool (00 or 000 equivalent)
and rub the box with the grain. It took about 15 minutes to bring both boxes
down to luster.
Personally, I think
the Pecan is gorgeous. It only costs 5-10% more than red oak, finishes much
easier, and is at least as hard as oak. (Hickory essentially looks the same
in veneer.) As far as cutting down the boxes, go for it if you choose. I played
them for a few hours while building the packing crate and cleaning up, they
sounded marvelous. No shortage of bottom end. Tight clean and neutral. The new
owners have called me three different times to rave about some new detail they
never heard before.
If you are a newbie
in speaker building, the Opals are an easy kit to start with. Don't just sit
there, make some sawdust!