![]() Pictures , Sketches, Links here
Pictures , Sketches, Links here
After living with my Emerald - Encore - Titan home theater setup for a year or so, I found myself getting addicted to music again. Yeah, DVD movies are totally engrossing but that's also a problem. Tough to do anything else while you're watching!
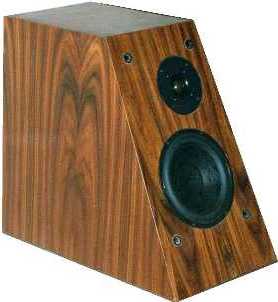
Since I spend a lot of time in front of my square headed girlfriend, I thought it would be great to have some quality, eclectic music while surfing, looping and "if-ing". The Emeralds would make a killer office stereo. That meant more speakers. With the winter coming, (optimal building season here in the desert), I decided to feed the need for DIY kits from ACI. After much debate, I decided to replace the Emerald mains in my home theater with a no-compromise set of Jaguars. (Gotta do something fun with all that Y2K programming money!)
Shopping
These Jags aren't being built to save money (though you just can't help it with kits!) I spent quite a bit of time looking for tools, veneer, and gadgets. I really enjoyed working with the man-made birds-eye maple I used on my Titan. Unfortunately, I couldn't find any more of it. Since my wife and I don't subscribe to Martha Stewart Living, I decided the Jags deserved a personality of their own. I finally settled on Santos Rosewood for the new beasts. I bought a 4 x 8 sheet of NBL (no black line) from TapeEase. The NBL is nicely done. The face veneer is book matched. The rosewood is then sandwiched with two layers of moisture-proof paper and backed with another layer of lesser grade veneer. It's quite flexible and easy to work with.
For ancillary parts, I found some 2" adjustable ports with screw on flanges, a Jasper Circle Cutting jig, and more HeadLock fasteners at Parts Express.
Cabinet Design
I looked over the Jaguar plans and decided that I could revise them to make them a bit easier to build. I came up with a set of Sapphire style cabinet plans and ran them past ACI. But, I finally decided the pyramid shape was just too sexy. Since I have access to 1" MDF, I revised the dimensions a bit to accommodate 1" stock for the top, bottom, and back. I eliminated the top inside brace and recalculated volumes. I used 3/4 for the sides (with ACI's bracing scheme), and 1-1/4" for the speaker baffle. This design maintains the facade of the original Jaguar
I began construction by cutting the backs. I used a taper jig on my table saw to get the angles parallel to my layout lines. It helped me a lot to make the first cuts oversized and nibble until I got the first piece right. I made three backs as a "just in case".
Using the back as a guide, I extended the saw blade to match the angle of the side taper. I made the first cut on each of the four oversize squares I would use for the sides. I next ran a piece of scrap through to get the taper. Using the scrap as a story board, I laid it along the back and marked the exact length. I then used the scrap to set the fence for my second cut, and ran the four sides through.
To lay out the front angle, I measured across the top and bottom to define the line. Unfortunately, this angle was too acute to use the taper jig. I setup an extra long fence on my miter gauge and carefully "nibbled" until I got each side cut.
For the tops and bottoms, I took all measurements by "storyboard" and nibble. First, I cut the front edge. Then each of the tapers on the side. Finally, I squared the blade and trimmed each "back" cut to length. This is the trickiest cutting process. Trying to keep all of the angles straight is complicated. Again I made a spare top and bottom. I wound up using both. The side braces were straight forward. I tapered the tops and set them up so they would support the top during glue up.
For joints I used a combination of biscuits and screws. Biscuits helped for lining up parts, though I only used them where two panels met at 90 degrees with square edges. I never built anything with oblique angles before. I'm used to bar clamps taking up any small gaps. You really can't clamp this box without using wedges. My joints didn't turn out quite as nice as I would have liked. Enter the amateur's best friend - construction adhesive. (I used PL200, but Liquid Nails would work just fine.) I liberally gooped all the edges, used wood glue on the biscuits, and managed to get the carcass together. I did take the time to scrape all the adhesive off while it was still wet. There were a couple of "gotchas" I discovered. Using thick stock means longer screws. The tough part is finding a pilot drill long enough to go through both pieces. Thin drill bits are usually pretty short. After one struggle, I found a way to get it done. I did two shallow screws to align the parts. I drilled as deep as I could. Then I removed the part, and drilled out the base. I had fewer split problems. I also used square drive trim screws. These didn't really need to be counter sunk. If you have a nail gun, use it.
The adjustable ports were designed to go through the box. Mike told me that the flared port was part of the design and that I should use it if possible. So I drilled a two inch hole through the back with a Forstner bit. I used a bit of silicone to secure the adjusted port length. Then 4 small woodscrews and a bit of silicone mounted the port to the back from the inside. I'd use my roundover bit on the outside of the hole, after the box is veneered.
The Front Baffle
I'm a compulsive planner. I wanted to do a 1.25 inch front baffle. I debated over two designs. The one I chose was to laminate the panels first, cut them to size, rout the holes and mount to the box. The second method would be to cut the 3/4 to fit inside the box, cut the 1/2" to fit outside the box; rout 4 speaker holes; put the 3/4 piece in the box; laminate the ½ inch piece to the box; trim the 1/2" holes to fit. I kinda wish I had chosen the second. (Note the box sided would have to be 3/4" deeper on method 2).
Laminating the pieces turned out to be a bit more challenging than I thought it should be. Turns out my 1/2" stock had warped a bit. Again I made 3 pieces. I cut oversized square panels from 3/4 and ½ stock. To hold them together I had to use several C-clamps or short wood screws. The one I did with toolboxes on top, never quite set up right.
Once the panels had dried, I first set the saw blade to the 26 degree front slope by aligning it with the box. I then cut the bottom miter. I next marked the tops of each baffle from a matching box. (They were slightly different). When I had the two miters done, I simply marked the side angles on each box. Setting the taper jig for the first cut is easy. You can do it visually by lining up the legs of the jig with the line and the square edge of the panel. For the second cut, I simply put the box, face down, on the table saw. Square one edge with the blade. Slide the jig between the box and the fence and the angle is good to go.
With the panels cut, I next took the scrapped third front and did some test holes for the speakers. I bought a Jasper Circle Jig. I must say I was impressed. Quite easy to use. There is a gotcha here too. The pin for the guide is about 1-1/2" long. However, the cutting surface on my 1/4" straight bit is only 3/4" long . I drilled the pilot hole all the way through the stock, routed out 3/4" from the top, flipped the piece, and routed out the other1/2" from the back. BE SURE to leave a couple of "webs" to hold the plug in place. I then removed the guide pin, and free handed the webs. I discovered that your guide hole must be perfectly plumb, or you will get a mismatched circle from the back cut. I did on one hole, but I used a flush trim bit to clean it up. On the Jaguars, only the tweeter hole is really critical because of the bulge for the leads on the back of the driver. For the woofer, there is a pretty dramatic taper to the basket, so any mismatch wouldn't matter.
Since I was using screws and glue, I wanted to veneer after the cabinet was assembled. If you use the Jasper jig to rout the flange recess, you'll need to be careful to allow for the veneer thickness. You could also veneer the whole box, then cut the speaker holes. With the slope of the front, I thought that might be awkward and risky too. I decided that I would do the flange recesses with my rabbet bit after the box was veneered. ( I have a nice bit from Amana Tool with four different bearings, Freud makes one too - highly recommended)
With the holes cut, I now proceeded to mounting the baffle. Here is where I wished I had used the alternative design. I really needed to clamp the face in place to even set the screws. The first baffle took a half an hour to finally get aligned and snug. I had gaps at the top, split one of the sides a bit, but finally I got it together. (Thanks to whoever invented construction adhesive!) Don't be a hero, get a friend to help hold stuff! (Unfortunately I didn't have any help). As my dear old Dad used to say "ahh, put a little gook on it, it'll be fine". With some patience, some filler and some time, I managed to get everything squared away. Veneer will cover a multitude of sins. (OBTW, I discovered that liberal amounts of WD-40 will help get that adhesive off your hands!)
For the second box, I finally got smart. I rummaged around in my many "miscellaneous" boxes and came up with a web clamp. (I thought I had two, but never did find the other). I wrapped the web clamp around the box on a dry fit, drilled all the pilot holes, then removed the clamp. I applied all of my adhesives, loosely refit the clamp to the box, aligned the front and drove home two screws to maintain alignment. Then I tightened up the clamp, drove all the screws home, and left it to dry. Much better! I wish I had thought about it earlier, it would have helped on the rest of the box too. (It occurs to me that this is the major problem with DIY- you need to screw up the first one to figure out how to do it right!)
Grilles
Despite claims to the contrary, the grills can be done quite quickly with a bit of planning. Because I chose not to chamfer or round the edges of the front baffle, I had a bit more flexibility in cutting the grilles. When I did the baffles I moved the fence about 1/8" into the blade and cut the grill frames as well. I planned to align them at the top and along the sides - leaving any reveal at the bottom. To begin the process, I decided where the final hedlock fasteners would go. I drilled 4 pilot holes through both grill blanks and screwed them together. Next I laid out the driver patterns on the blanks (draw circles for both tweeters). Then I took a straight edge and connected the edges.
Next, I ran my chamfer bit around all 8 outside edges. Screwing the blanks together allows you to cut both grilles at once. Using my plunge router, I then free handed the interior cutouts (who's going to see them?). If you use a 1/4" bit take about 1/4" on each pass. You can go a bit deeper with ½ shanks. Clean up with some sandpaper. I attached the Jasper jig before doing the inside. This allowed me to "bridge" the cutout hole. I then ran my 1/2" roundover bit around the inside. (Chamfer if you prefer). Flip the piece over and repeat the process. Unscrew the grilles and you are done in about 30 minutes!
Stands
I had originally planned on steel stands custom built by a welder friend of mine. As good as his work is, it's not always timely. (He does beautiful stainless work if any of you have a few $hundred lying around.) I couldn't see commercial stands for these "one of" speakers. With the square edges, and the acute angle of the front baffle, I wanted a stand top that would protect the veneer (and passers-by). I started by trying to design a four post tubular stand. Wood dowels were just too expensive and just didn't seem big enough. I thought of pvc pipe, but it just didn't seem stiff enough. Finally, I came across the perfect tube - steel electrical conduit. I chose 1.5" ID. A 10ft length costs about $7. I was concerned that any "elegant" joint between the conduit and MDF just wouldn't be stiff enough to resist racking. Then I hit on the idea behind the final design - a hybrid column and pipe stand.
At the rear of the stand, I fabricated a 26" long, 6" x 6" column out of 3/4 Mdf. Using simple butt joints with biscuits, I added one internal square to facilitate glue up. The bottom square was mounted flush, For the top square, and internal brace, I drilled out the center to allow sand filling. The 6 x 6 was turned 45 degrees. This made the corner to corner distance of about 8.4 inches.
For the front, I cut two strips 3" wide and 9.5" long, chamfered the edges, and drilled two holes 6" apart on center. A 1 5/8 Forstner bit in my drill press was a beautiful fit for the conduit. A little bit of Liquid Nails to bond the two and the poles were done.
The base is 16 x 20 x 1 MDF. These were deliberately oversized. My bedroom door opens into the living room next to the speakers. Better the stand should take the abuse than the speakers! I drilled out four holes at the corners, installed four steel, hex-drive, threaded inserts to accommodate the ACI Extra Points I bought. A roundover on the top edge is the only other treatment.
For the top, I did a roundover the lower edge, drilled holes for sand fill, and for mounting bolts. On the bottoms of the speakers, I would install four brass threaded inserts. This would allow me to bolt the stands to the speakers, but easily remove the speakers without damage. I then attached the column and the poles to the top with glue and screws. Then I repeated the process to attach the base. The stands are now ready for painting.
Although I toyed with the idea of veneering the stands, (or just the bases), but I had a good size remnant (about 3.5 by 4 feet) of veneer. I decided to save it for a new center channel (or possible screw-ups ). I sealed open edges with a 50:50 mixture of white glue and water. I then sprayed on two coats of flat black. With those dry, I followed with a can of that fake granite spray paint. (I really think it looks cheesy with a clear finish, but I liked the texture.) When that set up, I followed with 2 coats of flat black enamel, then 2 coats of clear gloss. The result is a kind of pebble grain finish.
Surface Preparation
The only real secret to veneering is good surface preparation. You need to sand the cabinets as if you are going to paint them. Most veneer is very thin, and will "telegraph" any screw heads, dings etc to the surface. Bumps are a lot worse than holes. If you sand over a bump, you can easily sand through the veneer. My first box had some pretty ugly gouges. (It cost me a belt on my table saw, but thankfully no hospital bill!)
Before sanding, I took the time to scrape off excess glue and construction adhesive. The adhesive never really "hardens" like wood glue. If you try to sand thru it, you'll just clog up your paper. If you use this "gook" for assembly, take the time to scrape. It's worth it.
When I opened up my can of wood filler, I found it in one chunk. I visited my neighbor to borrow some. He handed me a can of Bondo auto body filler. (An insurance adjuster who races stock cars-go figure!) I had seen several posts on the web about using this stuff with MDF. I read the directions and mixed up a batch. It did a great job - as long as you get it on 3-4 minutes! Fills nice, sands nice, even patched a corner ding with it.
When my giant globs of Bondo were dry, I knocked down the big humps with 60 grit on my orbital sander - along with my mismatched edges. I scraped out excess adhesive and finshed with 120. As a final test, I like push a putty knife over the entire surface. If it catches on anything, keep sanding.
Veneering
The NBL veneer came with the grain running vertically and a very nice book leaf match. The original flitch widths were 8 to 10 inches. At 49.5" wide, I was able to get two continuous pieces to go all the way around sides, top and bottom. The remaining strip was 11" wide. Perfect for the two faces and the backs. I always try to plan my cuts ahead of time, and leave a large scrap. I was glad I did. I screwed up the cuts on one of the "wrap around" pieces and was able to salvage another from the "scrap".
I first cut pieces for the back and front using my utility knife and a steel straight edge. (You can use scissors for cross grain.) I cut the pieces about 1/2" oversize. The NBL came backed with Luan veneer also running vertically. This creates a tricky situation for cutting those "wedges". If you bear down too hard, your knife will tend to follow the grain. Use several lighter cuts, rather than one or two hard ones. I marked center lines on each piece and on the cabinet.
At the recommendation of Tape-Ease, I chose a solvent based contact cement - applying two coats to both pieces. To facilitate the glue up, I put the cabinet up on a thick piece of cardboard as a spacer. I then placed the veneer on the table top, aligned the center lines, and gently "unrolled" the veneer while pressing it against the cabinet. Once down, I thoroughly rubbed the surface with a 6" plastic putty knife to seat the veneer, followed by a thorough pounding with my rubber mallet. ( I ran out of contact cement on the last bottom piece. I used the water based 3M product I used on my Titan. Major curling of the veneer. )
For flush trimming the edges, I used my flush trim router bit where there was a 90 degree joint. I used my manual method on oblique angles. I use a utility knife, starting first along the grain. Start the knife slightly outside the edge. Carefully, sink the knife through the veneer. Continue down the grain, using a gentle sawing motion. When done with the knife, use a sanding block with 220 paper to sand the veneer flush.
I started with the back, then did the front baffle. I then trimmed out the speaker and port holes with my flush trim bit. I flared the ports with my round-over bit, cut the speaker flange recesses with a rabbet bit, and drilled out the holes for the binding posts. One major caveat here. Measure your drivers very carefully (maybe a cardboard template) The ScanSpeak drivers are metric. I wound up using a 7/16 rabbet on the woofer. I had to take the bearing off my rabbet bit and delicately widen the tweeter recess about 1/32 to get the tweeter to drop in. If you have any doubts, make the holes a bit bigger.
For the final sequence, I did the sides, the top, and finally the bottom. ( I wanted to "protect" the edges of the front and sides.) I then installed the threaded inserts in the bottom of the speakers.
Finishing
The NBL veneer came fairly well sanded. After trimming all the edges, I chamfered each edge with 220 sandpaper and a block. I also did a light hand sanding of all surfaces, cleaned them with a tack cloth, and lightly wiped the surfaces with a rag dipped in lacquer thinner and let the box dry overnight. I also took some black craft paint and touched up the vent area and the speaker cutouts.
I wouldn't buy premium veneer then stain it. Since the boxes were to have a clear finish, the decision came down to lacquer or polyurethane. I love the look of lacquer but not the stink or expense. Polyurethane is cheap and durable, but cannot be easily repaired, and takes forever to dry. I opted for lacquer. Again I chose Deft Clear Wood Finish (gloss). This product is readily available in spray cans and for brush application. It's one of the few lacquers available to someone without a spray booth. Unlike the Titan, I decided to invest in a good brush for preliminary coats. I applied three to four coats with a brush. (I'll be damned if I can do smooth finishes on vertical surfaces with a brush though!) I first applied two liberal coats to the boxes. I then hand sanded with 220 and my newly acquired 3M rubber sanding block. (Highly recommended for $7) The lacquer turns to white dust making it easy to see bumps and troughs. I then applied two more coats with a brush. On each of these I did the sides, top, and face in a horizontal position to take advantage of the "self leveling" properties of the Deft. After each of these coats, I sanded with 400 grit. You can apply gobs more finish (per coat) with a brush than with spray. The down side is the extra drying time - and cleaning your brush every time in lacquer thinner.
A word about touch ups. I used a walnut filler on some of the corner dings but it was too red for the Santos. The acute front edge is really delicate. (Now I know why ACI did the beveled bottoms on the Jaguar 2000). I used a combination of brown and black magic markers to cover dings and some exposed veneer edges. I used the brown to put in background, the black to add grain. Smudge a bit with your finger, and only close inspection will tell. The luan backer on the veneer showed through on edges. I tried to "brown it out" on the lower back, but it didn't look right. I left it alone for the rest of the box. (It's not a bug, it's a feature!)
When the four brush coats were done, I installed the threaded inserts in the bottom of the speakers, and drilled the 7/16" holes, and installed the HedLock fasteners. (Tip: punch or drill a small hole in the bottom of female hedlock. If you silicone these in place, this will allow excess glue to get out. Clean out the excess immediately.) The final few light coats were then applied from a spray can, sanded with 600, and resprayed. I finally rubbed out the dried finish with synthetic 000 steel wool.
Final Assembly and Crossovers
The crossovers take a bit of patience. There are quite a few large, iron core, coils. Definitely lay out the parts, silicone them to your backer board, and let them dry before trying to solder. Be aware that the Jaguars are mirror imaged. The crossover is mounted on the side brace inside. This will change the lengths of wires going to the binding posts and drivers. The amount of wire provided is adequate but not overly so. I wound up being a bit short because I precut the wires. I would suggest making mirror imaged crossovers or marking the individual boards for its appropriate cabinet. The lugs for the binding posts can be separated from the posts. Although ACI provides push on clips for these, I chose to solder them to the wires. I did use the clips for the drivers however. I also recommend heat shrink tube, or tape around the solder joints. This will help prevent scratching you, the cabinets, and prevent shorting.
Putting in the terminals, stuffing the box with foam and Dacron, and mounting the drivers went pretty much as depicted in the ACI manual. Because I soldered the lugs, I had to put the lug, lockwasher, and nut on through the woofer hole. A nut driver, or straight socket makes this much easier. Be aware, the bindingposts supplied are only about 1-1/8" long. Counter sink the inside of the cabinet with a spade bit to give your self enough clearance to start the nut.
Make ABSOLUTELY sure you pre-drill holes for all of the speaker mounting screws. There is very little wood left to hold the screws. Tighten the screws gradually, using a crossover pattern like you do when changing a tire. I don't think the woofer would accommodate T nuts - unless you made a smaller hole toward the inside of the cabinet.
For the grilles, I went to the fabric store. (Yeah, you can buy "grill cloth" if you want.) I selected a sheer black nylon "lingerie" fabric. It stretched a little vertically, quite a bit horizontally, and had a nice silky shimmer. Some people use spray adhesives and/or staples. I use hot melt glue. (Tip: put a band-aid on your middle finger so you can press the cloth without getting burned.) I started on the bottom edge, with a spot of glue in the center. I then stretched the cloth long ways, aligned it, and put another spot of glue on the center of the top. Next, stretch the cloth sideways along the top, and along the bottom, from center to each outside edge. Then do the sides, leaving an inch or so unglued at each corner. Finally, pull the corners tight and glue.
For final installation, I installed the ACI Extra Points (they disappeared into my carpet however.) After placing the stands, I used two side-by-side strips of natural rubber weather strip, (1/8 thick) around the outside of the tops to act as a gasket. I also did a few strips across as well. After splitting a 75 lb bag of sand between the stands, I mounted the speaker, and used 1" long, 1/4" bolts to secure the speaker to the stand.
While watching TV over several evenings, I assembled some braided Category 5 network cables into speaker wires. Each speaker cable consists of four braids. Each braid has five pairs of 24ga, Teflon insulated wires. Gather all the stripes for negative, all the solids for positive. One braid for the tweeter, three for the woofer. (About 11ga total) I used four spades at the speaker, and a two gold pins at the amp side. I don't know if these are high end voodoo or have real sonic value. They are cheap, but time consuming. Some mindless therapeutic value as well. They look impressive though! These were hooked up to my old Carver Cube power amp. At Mike D's suggestion, because I have aTitan, I used a pair of ACI's 65hz filters between my receiver and the power amp. With everything pugged in, we're ready for audition.
So How Do They Sound?
In a word, mahvelous, dahling! I know the Jaguars will need about 100 hours to stabilize and break in. I did quite a bit of diddling on the first day. Messing with the Titan crossover point, various levels and positioning. For my tastes, I liked the 65 Hz filters in place, the ports stuffed, my Titan crossed over at about 65 Hz, and the grilles removed. The grilles definitely confine the image.
I also tried the Jags with my Titan out of the system and the 65 Hz filters removed. I found the bass to be entirely adequate for music listening. Full and rich. I could definitely see the difference in draw on the meters of the power amp.
But I'll tell you what I heard. I used my "standards" (Santana, Linda Ronstadt, Alan Parsons,... see my other article) plus a few more cuts. The soundstage is absolutely incredible. The depth and clarity of midrange is hard to believe. I even heard the tape hiss from some of the older analog-mastered discs.
Some other discs of note. Erich Kunzel's "Great Fantasy Adventure Album" (Telarc 80342) has some spectacular special effects. CyberGenisis/Terminator Theme (cuts 19 & 20) feature explosions, laser battles, and heavy machinery - all mixed over the Cincinnati Pops Orchestra. The dynamic range of this piece is staggering. The Jaguars handled it with ease. Strings from the orchestra were clearly visible over the effects. My cocker started wailing - I guess the highs were there too.
So how about chamber & acoustic presentation? For that I selected "Desert Reflections" by The University of Arizona's Harp Fusion Ensemble. (Nine world class, world touring musicians). Elite Syncopations (an arrangement from Scott Joplin) and In the Mood (from the 40's swing era) feature complex arrangements, harmonies, and swift tempo. I swear I could damn near pick out the individual players! (My wife took me to one of their concerts last week so I heard these pieces live.) Another piece features a bell chorale, indeed the Jaguars were "clear" as a bell.
So how do the Jaguars match up with the Emerald center on DVD? Pretty close. The Jags are definitely more "articulate". With the sloped fronts, it's a bit difficult to place the center channel in the same vertical plane as the Jaguars. The sound field simulations on my Yamaha receiver (theater, concert hall etc.) are greatly exaggerated by the Jaguars. Running the Jags as "large" definitely adds a lot of bass in the 65-90 hz range. The Vifa tweeter in the Emerald is a very tolerable match. I think the 3 Emerald set up had a bit more coherent soundstage, but the Jaguars add quite a bit more sonic detail - particularly on the high end. Since I'm now running an old Carver power amp with the Jags (vs running the Emeralds off the receiver), this really isn't and A/B comparison.
After about a week, the initial sibilance and sizzle on the high end is gradually disappearing - just as ACI said it would . This seems to be a characteristic of ScanSpeak tweeters when new. My Emeralds greatly improved with time as well. It wouldn't be fair to really report in detail until after the Jaguars are broken in, and I'm done tweaking. At this point, I can truly say these are the finest speakers I have ever owned, and maybe the best I've heard.
So Is He Ever Going to Finish...
Yeah, I wrote this to let you know what it took to build these kits. I didn't really keep track of my time, but I'd say I have 80 to 100 hours or so in this project. About 20 of that on finishing. Hard to really estimate. So much time is waiting for stuff to dry. I didn't really worry about cost either. The 4x8 sheet of veneer was about $140 with another $60 or so for finishing. I had much of the MDF in stock.
Some thoughts on how I might do it differently next time: